Rendering recursive portals with OpenGL
For the last couple of months I’ve been working on and off on my C++/OpenGL “game engine”, mostly for the purpose of learning OpenGL. The feature I was the most excited about trying to implement in this engine was portal rendering. Actually understanding and implementing that correctly has taken me a little while but I feel like I know enough now to explain some of the concepts here.
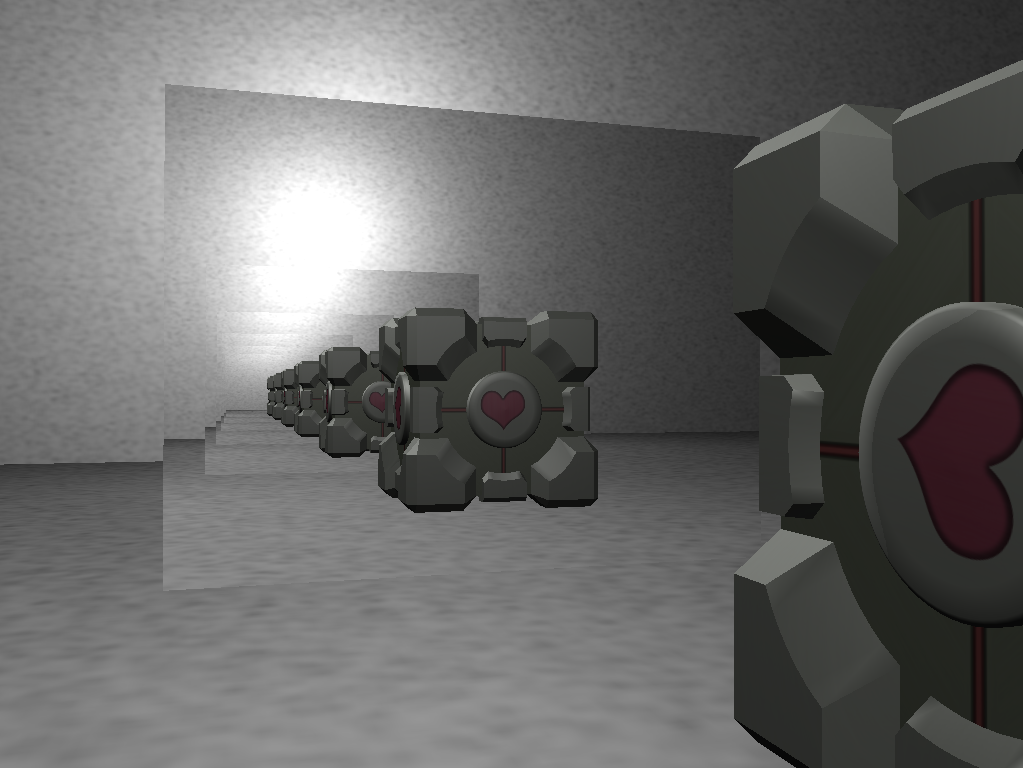
Companion Cube sees itself
At this point I’m going to assume that you know the concept of portals as made famous by the game Portal, notably the idea of pairs of portals where looking at one will show you the scene from the viewpoint of the other and vice versa. Henceforth I will be calling the portal that’s currently being rendered the source portal, while calling the portal to which the source portal links the destination portal.
Rendering a single portal
When rendering a scene with a portal within the camera’s vision we’re actually rendering everything twice, first we draw the scene outside of the portal’s frame and then inside of the portal’s frame. The scene that is drawn inside of the portal’s frame is drawn from the perspective of a virtual camera. This virtual camera’s position and orientation (i.e. its model matrix) are calculated as follows: Take the distance and angle (the transformation matrix) from the camera to the source portal and apply the inverse of that to the destination portal to get the position and angle of the virtual camera. This works well but there’s one catch: there cannot be an object behind the destination portal, or in other words, between the virtual camera and the destination portal. If there is such an object then it will obstruct our view of the virtual scene inside of the portal. See the illustration below:
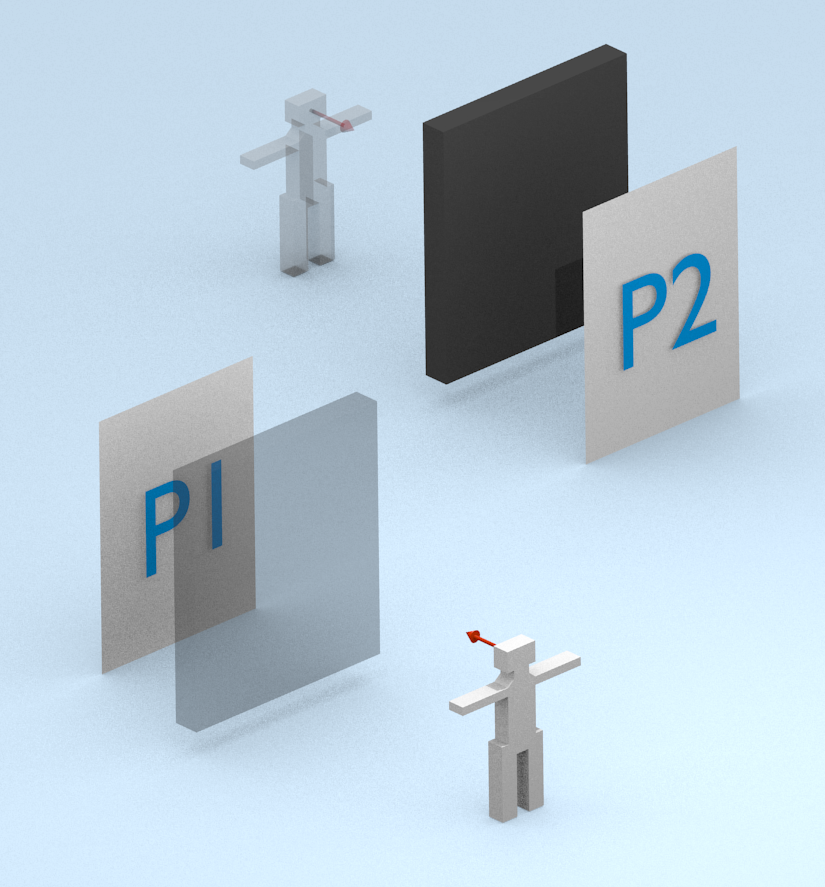
Scene with blocking object between virtual camera and the back of the destination portal
A solution for this problem is to change the virtual camera’s view matrix in such a way that its near plane starts at the plane of the destination portal. This is easily doable in the situation pictured above where the portal’s plane is perpendicular to the view vector, we would only have to change the near value to the distance from the virtual camera to the portal. However in other situations this isn’t as easy, and the resulting view matrix would not have the shape of a frustum. Luckily those shapes can still be represented by a matrix, and there’s a trick to modifying an existing view matrix so that the near cut off plane is an arbitrary plane. This technique is called oblique view frustum near-plane clipping. You can see my implementation of it here.
Now that we have a correct virtual view matrix, we can go on to actually rendering the portal. There are two popular techniques to do this with:
Rendering to a texture
This technique is generally accomplished in OpenGL using Frame Buffer Objects (FBOs). The process is basically as follows:
- Create an FBO and set it as the current render target
- Generate the virtual camera’s view matrix using the view frustum clipping method.
- Render the scene from the viewpoint of the virtual camera, this will fill the FBO with the rendered frame.
- Render the scene normally from the regular camera but apply the newly generated texture from the FBO to the portal’s frame.
This seems pretty straightforward and although the last step takes some extra math to generate correct texture coordinates, it’s pretty doable. There is one big disadvantage though: texture resolution. From a distance this technique will look just fine, but as soon as you get really close to the portal – which is a thing that happens a lot, since in most situations they’re meant to be walked through – the individual pixels of the portal’s texture will really start to show. A potential fix could be to increase the texture’s size, but this brings up other issues such as GPU memory usage, especially when we’re going to be doing this recursively later on. Because of these reasons I’ve decided to go for the stencil buffer method as explained below.
Using the stencil buffer
The other popular way to render portals is to use the magical stencil buffer. This is a special buffer in graphics cards (in addition to the color buffer and the depth buffer) that can be used to mask out certain areas of the screen to prevent or allow drawing on the pixel level. This really just means that for every pixel on the screen there’s a small number (usually 8 bits) in the stencil buffer that you can write to and that the GPU can look at to determine whether or not to draw a pixel. This is very convenient because we can then just use multiple render passes with different stencil buffer contents, and use that to draw both the inside and the outside of the portal frame without using a separate render target.
When using the stencil buffer there’s basically two things you have to think about:
- Do I want to look at the contents of the stencil buffer to determine whether or not to draw a pixel?
- Do I want to modify the contents of the stencil buffer when drawing? If so, on what condition?
The first situation can be controlled by enabling or disabling the stencil test, respectively with either glEnable(GL_STENCIL_TEST) or glDisable(GL_STENCIL_TEST). When drawing a pixel with the stencil test enabled the graphics card will apply a test between the current value of the stencil buffer and the reference value. Both the type of test and the reference value can be set with the function glStencilFunc.
The second situation can be controlled by the stencil operation. This is set by the function glStencilOp which requires three arguments:
sfail: The operation to execute when the stencil test fails.dpfail: The operation to execute when the stencil test passes, but the depth test fails.dppass: The operation to execute when both the stencil test and the depth test pass.
All three arguments accept operations like (but not only):
GL_KEEP: Keep the current stencil value.GL_INCR: Increase the stencil value by one.GL_DECR: Decrease the stencil value by one.
Now it should become quite clear how to render a single portal with the help of the stencil buffer:
- Disable drawing to the color buffer and the depth buffer, but enable writing to the stencil buffer.
- Set the stencil operation to
GL_INCRonsfail, meaning that the stencil value will be incremented when the stencil test fails. - Set the stencil function to
GL_NEVER, which makes sure that the stencil test always fails on every pixel drawn. - Draw the portal’s frame (in the case of a rectangle: just two triangles). At this point the stencil buffer is filled with zero’s on the outside of the portal’s frame and one’s on the inside.
- Generate the virtual camera’s view matrix using the view frustum clipping method.
- Disable writing to the stencil buffer, but enable drawing to the color buffer and the depth buffer.
- Set the stencil function to
GL_LEQUALwith reference value 1. This will only draw where the stencil value is greater than or equal to 1, which is inside the portal frame. - Draw the scene using the virtual camera from step 5. This will only draw inside of the portal’s frame because of the stencil test.
- Disable the stencil test, disable drawing to the color buffer, and enable drawing to the depth buffer.
- Clear the depth buffer.
- Draw the portal frame once again, this time to the depth buffer which was just cleared.
- Enable the color buffer again.
- Draw the whole scene with the regular camera.
It might not be clear at first why the portal is drawn twice: once in the stencil buffer, and once in the depth buffer. This is because in some cases we want the portal (by which I mean every virtual object that was rendered inside it) to be obscured by real objects in the scene. This is what the depth buffer is good at so that’s why it comes into play at the end.
For simplicity’s sake I explained how to render a single portal. Rendering multiple portals – with which I mean portals from the same level, as in portals from different pairs, not recursive portals – is very easy as well, it’s basically step 1 through 8 repeated in a loop. If you think about how this affects the stencil buffer you might see why I chose GL_LEQUAL instead of GL_EQUAL in step 7.
Recursion
Now that we can render a single portal it shouldn’t be too hard to render portals recursively right? Well, even though the same techniques are used, it’s quite a lot more complicated and requires really bending your mind on what is in every buffer after every operation. I won’t present every step like I did in the previous section but I’ll explain some of the difficulties I came across and give you my final code.
The general trick to doing the stencil buffer method recursively is to increase the stencil value for every depth level. We should then be able to draw the n-th virtual scene in the area that has a stencil value of n. See the image below.
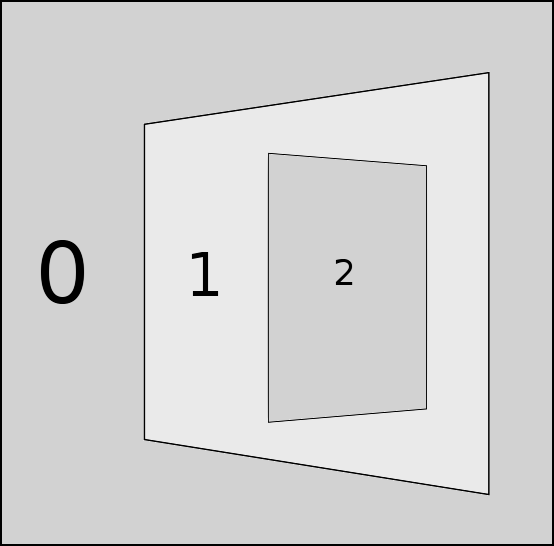
Values of the stencil buffer
This can be done by recursively filling the stencil buffer with any portal frames at the current level, then increasing the stencil value by rendering the virtual portal(s) of the next level with the GL_INCR operation. When we’ve then reached our maximum recursion level, we start to draw the virtual scenes from the bottom up, starting at the highest stencil value, until we’re back at zero.
There is still one catch though, imagine the following scenario:
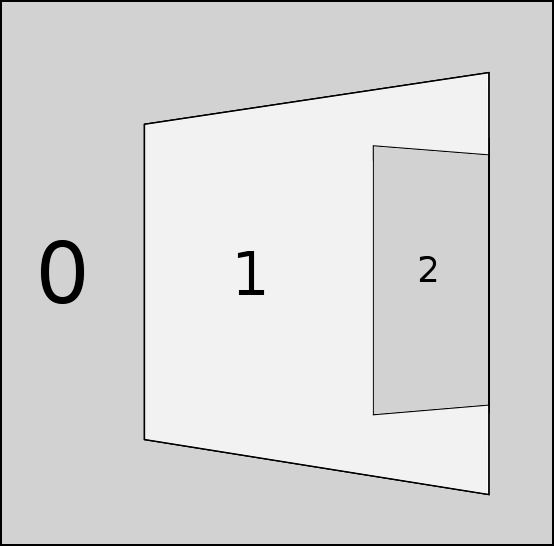
Values of the stencil buffer in a different situation
Here the virtual portal of level two overlaps the border of the portal on level one. What the image shows is how it is supposed to be rendered, but our naive method doesn’t quite render it like this yet. To obscure the part of the portal on level two, we have to enable the stencil test for the part where we render our portal to the stencil test. This is rather confusing and it took me a while to get it working, but once implemented the technique seems very robust and I haven’t found any cases yet that aren’t rendered correctly.
Something to think about when doing recursive rendering is of course performance. The screenshot at the top of this post slowed my engine down to less than 60 FPS while it normally runs at a couple hundred FPS. A good idea would be to think about only rendering parts of your scene virtually, possible using a technique like binary space partitioning (BSP). What’s also interesting is that to my knowledge, Valve used a combination of the methods explained above to keep performance high in Portal. They would render the first couple of recursions using the stencil buffer method while using the render-to-texture method for deeper recursion levels since those only fill very small parts of the screen.
Code
Here’s the resulting code on GitHub. There are still various edge-cases that cause weird behavior, so feel free to open a pull request if you manage to improve something :)